
This section contains a detailed description for all features and settings Lidc has to offer. You may click on any category or item listed in the contents table to navigate automatically to that part of the guide. Additionally. each major section is followed by a slideshow that includes screenshot of the parts of the software discussed in that section while at the end of the guide you may find some cool tips about what you can do with Lidc.
The basic definition of multiboxing in MMORPG games, is when one single person is controlling more than one characters at the same time. In other words, imagine having a dps character and a healer character always behind you, keeping you alive, while you set out on your quests in the world of your favorite game. Better yet, imagine controlling an entire team of your own to help you go through the hardest of endeavors. Such a thing can be achieved by the use of a software which can broadcast your key presses and mouse clicks to the rest of your team while yourself are only directly controlling your main character.
A multiboxing software, like Lidc, is designed to help you in controlling your team in a way that makes your gaming experience smooth and enjoyable. The way this works, is that Lidc offers you the ability to define a set of keys or key combinations that will be sent to the rest of your team, while you are only directly controlling your main character and without having to switch to their game windows. You should then bind those keys or key combinations to character abilities or macros within your game so that they will be activated when you press them on your keyboard. Some of the usual bindings you will want to assign to your characters include macros to follow your main character, assist your main character and cast offensive abilities or target team members and cast healing abilities.
While key and mouse broadcasting is the minimum functionality you will require to sucessfully multibox a team of characters, you will find that Lidc also offers a rich variety of features that will prove very useful in managing and controlling your team. These features include a launcher that can automatically fill in your account information, a layout designer to allow you to easily position your character's game windows on your screen and many hotkeys so that you can control Lidc right from within the game window ensuring uninterrupted and smooth playing experience.
Lidc does not alter, affect or interfere with your game in any way and it is not considered a hack nor a bot. Lidc places itself between the game and the operating system and uses the functionality provided by the operating system, in order to provide you with the tools you need to duplicate your input across multiple clients. However, the actual action of multiboxing is subject to the game server rules and therefore we strongly recommend that you read the rules laid out by your server to make sure multiboxing is allowed in your case.
This guide will show you the minimum amount of steps you need to follow to start using Lidc.
It is meant to be used as a startup guide if you are a new user.
- First, navigate to the
Click on the
- Next, navigate to the
The first time you run Lidc, the predefined key list called "All Keys" will be pre-selected for you, which means that all keyboard and mouse keys will be broadcast to all clients. To define your own set of keys, click on the key lists drop down list at the top and select the "User Defined" key list. Click inside the input box
Thats all! You are setup and ready to play!
Navigate back to the Characters Page, click on the
Finally, make sure you bind the keys and key combinations you added in the Input Page, to character abilities or macros within your game, so that they may be activated when you press those keys or key combinations on your keyboard.


The
- Name
The character name specified in the name field of the character settings accessible when using the Add Character function.
- Status
This column will show you the current status of this character. Its value will be initially set to Stopped and will change to Running when you launch this character using the Run menu. It may also provide error information when there is an issue with launching this character.
- Keys
When this setting is enabled, this character will receive keyboard input when key broadcasting is turned on. This feature allows you to exclude a character from receiving keyboard input even if it is running and key broadcasting is turned on.
- Clicks
When this setting is enabled, this character will receive mouse input when mouse broadcasting is turned on. This feature allows you to exclude a character from receiving mouse input even if it is running and mouse broadcasting is turned on.
- Name
Enter a name for your character, usually the same name as the character's name you want to play.
- Game
Select the game to use with this character or click on the + icon to add a new one.
- Game Settings
If the selected game is supported, the game settings icon (...) will be enabled. You may then use this feature to specify individual in-game settings for your character like low or high graphics settings. Please refer to our
- Account
The account logon name for this character. This will be filled in automatically when you launch the game.
- Password
The password for this account. This will be filled in automatically when you launch the game.
- Autoconnect
Enable this to automatically connect to the game using the logon information specified in the account and password fields.
- Show Password
Reveals the password in the password field.
- Window Title
The title of the game client window. Usually the same name as your character.
- Hotkey
This key combination will cause a switch between your active character's window and this character's window.
- Exclude from Shutdown
This character will be excluded when using the Shutodown All Clients hotkey, specified in the Input Page.
- CPU Affinity
Choose which CPU cores this client is allowed to run on. Spread your characters among your available CPU cores to improve performance. Check the Assign Automatically option to have LIdc assign automatically the CPU core with the least load every time you launch a new client.
- FPS Limiter
The FPS value, or frames per second, designates the rate at which the client renders the game graphics on your game window. While a higher FPS value may result in a higher quality display, it also results in higher system resources usage. Therefore, when running multiple clients, graphics rendering may appear slow or sluggish on your clients while they fight each other for system resources. By using this feature, you may limit the FPS rate of the clients of your choice, preferably the ones that will be just running in the background, thus allowing more system resources for your main client. If you set this option to Auto, clients that do not share a CPU core will be unaffected while clients that share a single CPU core will be limited with a low value if they are running in the background and a high value if they are running in the foreground. Additionally, these values will be changed automatically while you switch between your clients.
Select a character and click on this button to remove it. This character will also be removed by any associated groups and layouts.
Select a character and click on this button to modify the character's settings.
Use this feature to modify the order in which your characters are listed in the Characters Panel and consequently the order they appear in all character lists as well as the order in which they launch when you use the Run All function under the Run menu.
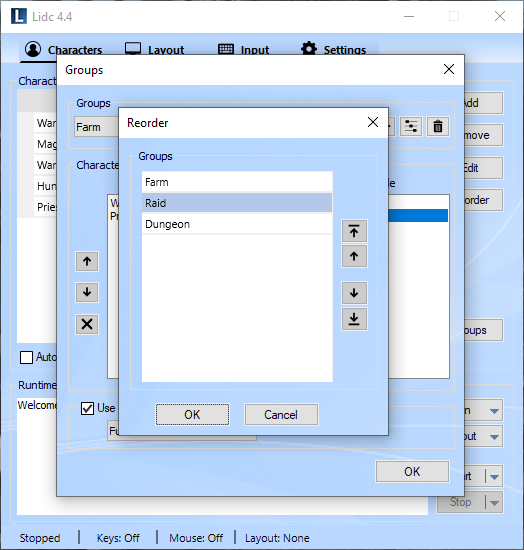
Use this feature to create groups for your characters. Any groups you create will appear in the Run menu allowing you to launch all included characters easily with one click. You may also assign a layout for your groups which will then be applied automatically upon launching.
Access the Groups dialog by clicking on the Groups button on the Characters Page.
Click on the + icon and provide a name for your new group.
Select any character from the available characters list and click on the left arrow to add it to your Group.
You may reorder your characters by selecting a character in the group and using the up and down arrows to change its position in the list. This is the order in which your characters will be launched when launching this group using the Run menu in the Characters Page.
To assign a layout for this group enable the Use Layout setting and select the desired layout in the drop down list. The selected layout will be automatically set as active when launching this group using the Run menu in the Characters Page. Note that the active layout is a global setting and thus it will also affect any already running characters provided they are part of this layout.
You may also change the order in which your groups appear in the run menu. To do so, click on the reorder icon next to the plus icon and move your groups up or down in the list by selecting the group you wish to move and then the move arrows next to the list.
Enable this to automatically detect and use clients that you have launched directly using their shortcut or by running their executable file. Any detected clients will be added in the Characters Panel allowing you to include them when broadcasting your keys and mouse. Additionally, you may specify a name for any detected clients and use them in other featuress of the software. Please remember though, that those clients are only temporary and will be removed when closed.


The
Use the Run menu to launch your characters. This menu includes the following choices:
- Run All
All your characters will be added to the queue and launch in sequence from top to bottom.
- Character names
Choose any of your characters to only launch this character.
- Groups
Any groups you have created will also be listed under this menu. Choose a group name to launch all the characters included in this group in the order you have defined in the group's settings. Additionally, if you have assigned a layout to the group, that layout will be automatically set as active.
- Layouts
Any layout you have created will also be listed under this menu. Choose a layout name to launch all the characters included in this layout. The selected layout will be set as active and any running characters as well as any characters you launch later, will automatically transform to the position and size defined in this layout.
Use the Layout menu to change the active layout. Any running characters as well as any characters you launch later, will automatically transform to the position and size defined in this layout.
Use this menu to Start broadcasting. You may choose between Keys and Mouse:
- Keys
Keys on means that all keys added in the current input list under the Input Page will be broadcasted to your running characters. This includes all keyboard keys as well as mouse buttons except mouse left and right buttons.
- Mouse
Mouse on means that left and right mouse buttons will be broadcasted to your running characters, provided they are added in the input list under the Input Page. Mouse movement will always be broadcasted when mouse broadcasting is on.
Use this menu to Stop broadcasting. You may choose between Keys or Mouse.
The Runtime Log displays various runtime information like character launch progress or broadcasting status. It may also provide error infrormation if an issue presents itself.


The
Access the Layout Designer by clicking on the Edit with Designer button on the Layouts Page.
Click on the + icon and provide a name for your new layout or select any of the existing layouts to modify it.
Select a character from the Available Characters dropdown list and click on the left arrow to add it in the layout.
Drag or resize the added character window in the design area to place it at the desired position and size. Repeat this for the characters you wish to include in this layout.
To remove a character, select it in the Selection Settings dropdown list and click on the x icon.
Click on the Save button to save your changes.
The Layout Designer also offers the following options to aid in designing your layout:
Each monitor icon represents a physical monitor on your system.You may select the monitor you wish to add characters to, by clicking on its icon.
Enable this setting to show a grid in the design area to help you align your clients more accurately. You may also enable the Snap to Grid setting which will cause the edges of the clients to automatically snap on the grid corners while you resize your characters.
When this setting is enabled, any characters you reposition or resize in the design area will also cause their respective clients to transform automatically provided they are already running.
Enable this setting to automatically attach a client's side to an adjacent client while resizing by dragging any of its handles.
When this setting is enabled, each client will be drawn using an image from the game it's assigned to.
Enable this setting to exclude the windows taskbar from the design area. The effect of this setting enabled you to place a client all the way to the bottom of the design area without having it cover the windows taskbar when running.
Enable this setting to remove the caption bar and non-client area of the game windows included in this layout.
Enable this setting to force all clients to render using the same resolution. Normally the game client will adjust its resolution automatically in order to fit the size of your window which may result to game elements rendering differently between windows of different size. This behavior may cause issues with mouse broadcasting. For example you may wish to click a button on all your clients at the same time but the relative location of that button on your main client (which is usually bigger in size) might not be the same as the location of that same button on your slave clients (which are usually smaller). This setting will cause the game to render the same on all windows and then stretch the contents to fit the window size, which avoids this issue. Please note, that when stretching occurs, content may appear a bit blurry. Therefore, It is recommended that you set this resolution to be the same as your main client to avoid stretching on the window where you will be actively playing.
The selection settings include a dropdown list of all characters included in this layout and numeric fields that represent the client's position on the screen as well as numeric fields representing the client's width and height. You may select any character in the dropdown list and use the numeric fields to adjust its position and size more accurately.
Select a monitor from the list to move the selected client to that monitor automatically.
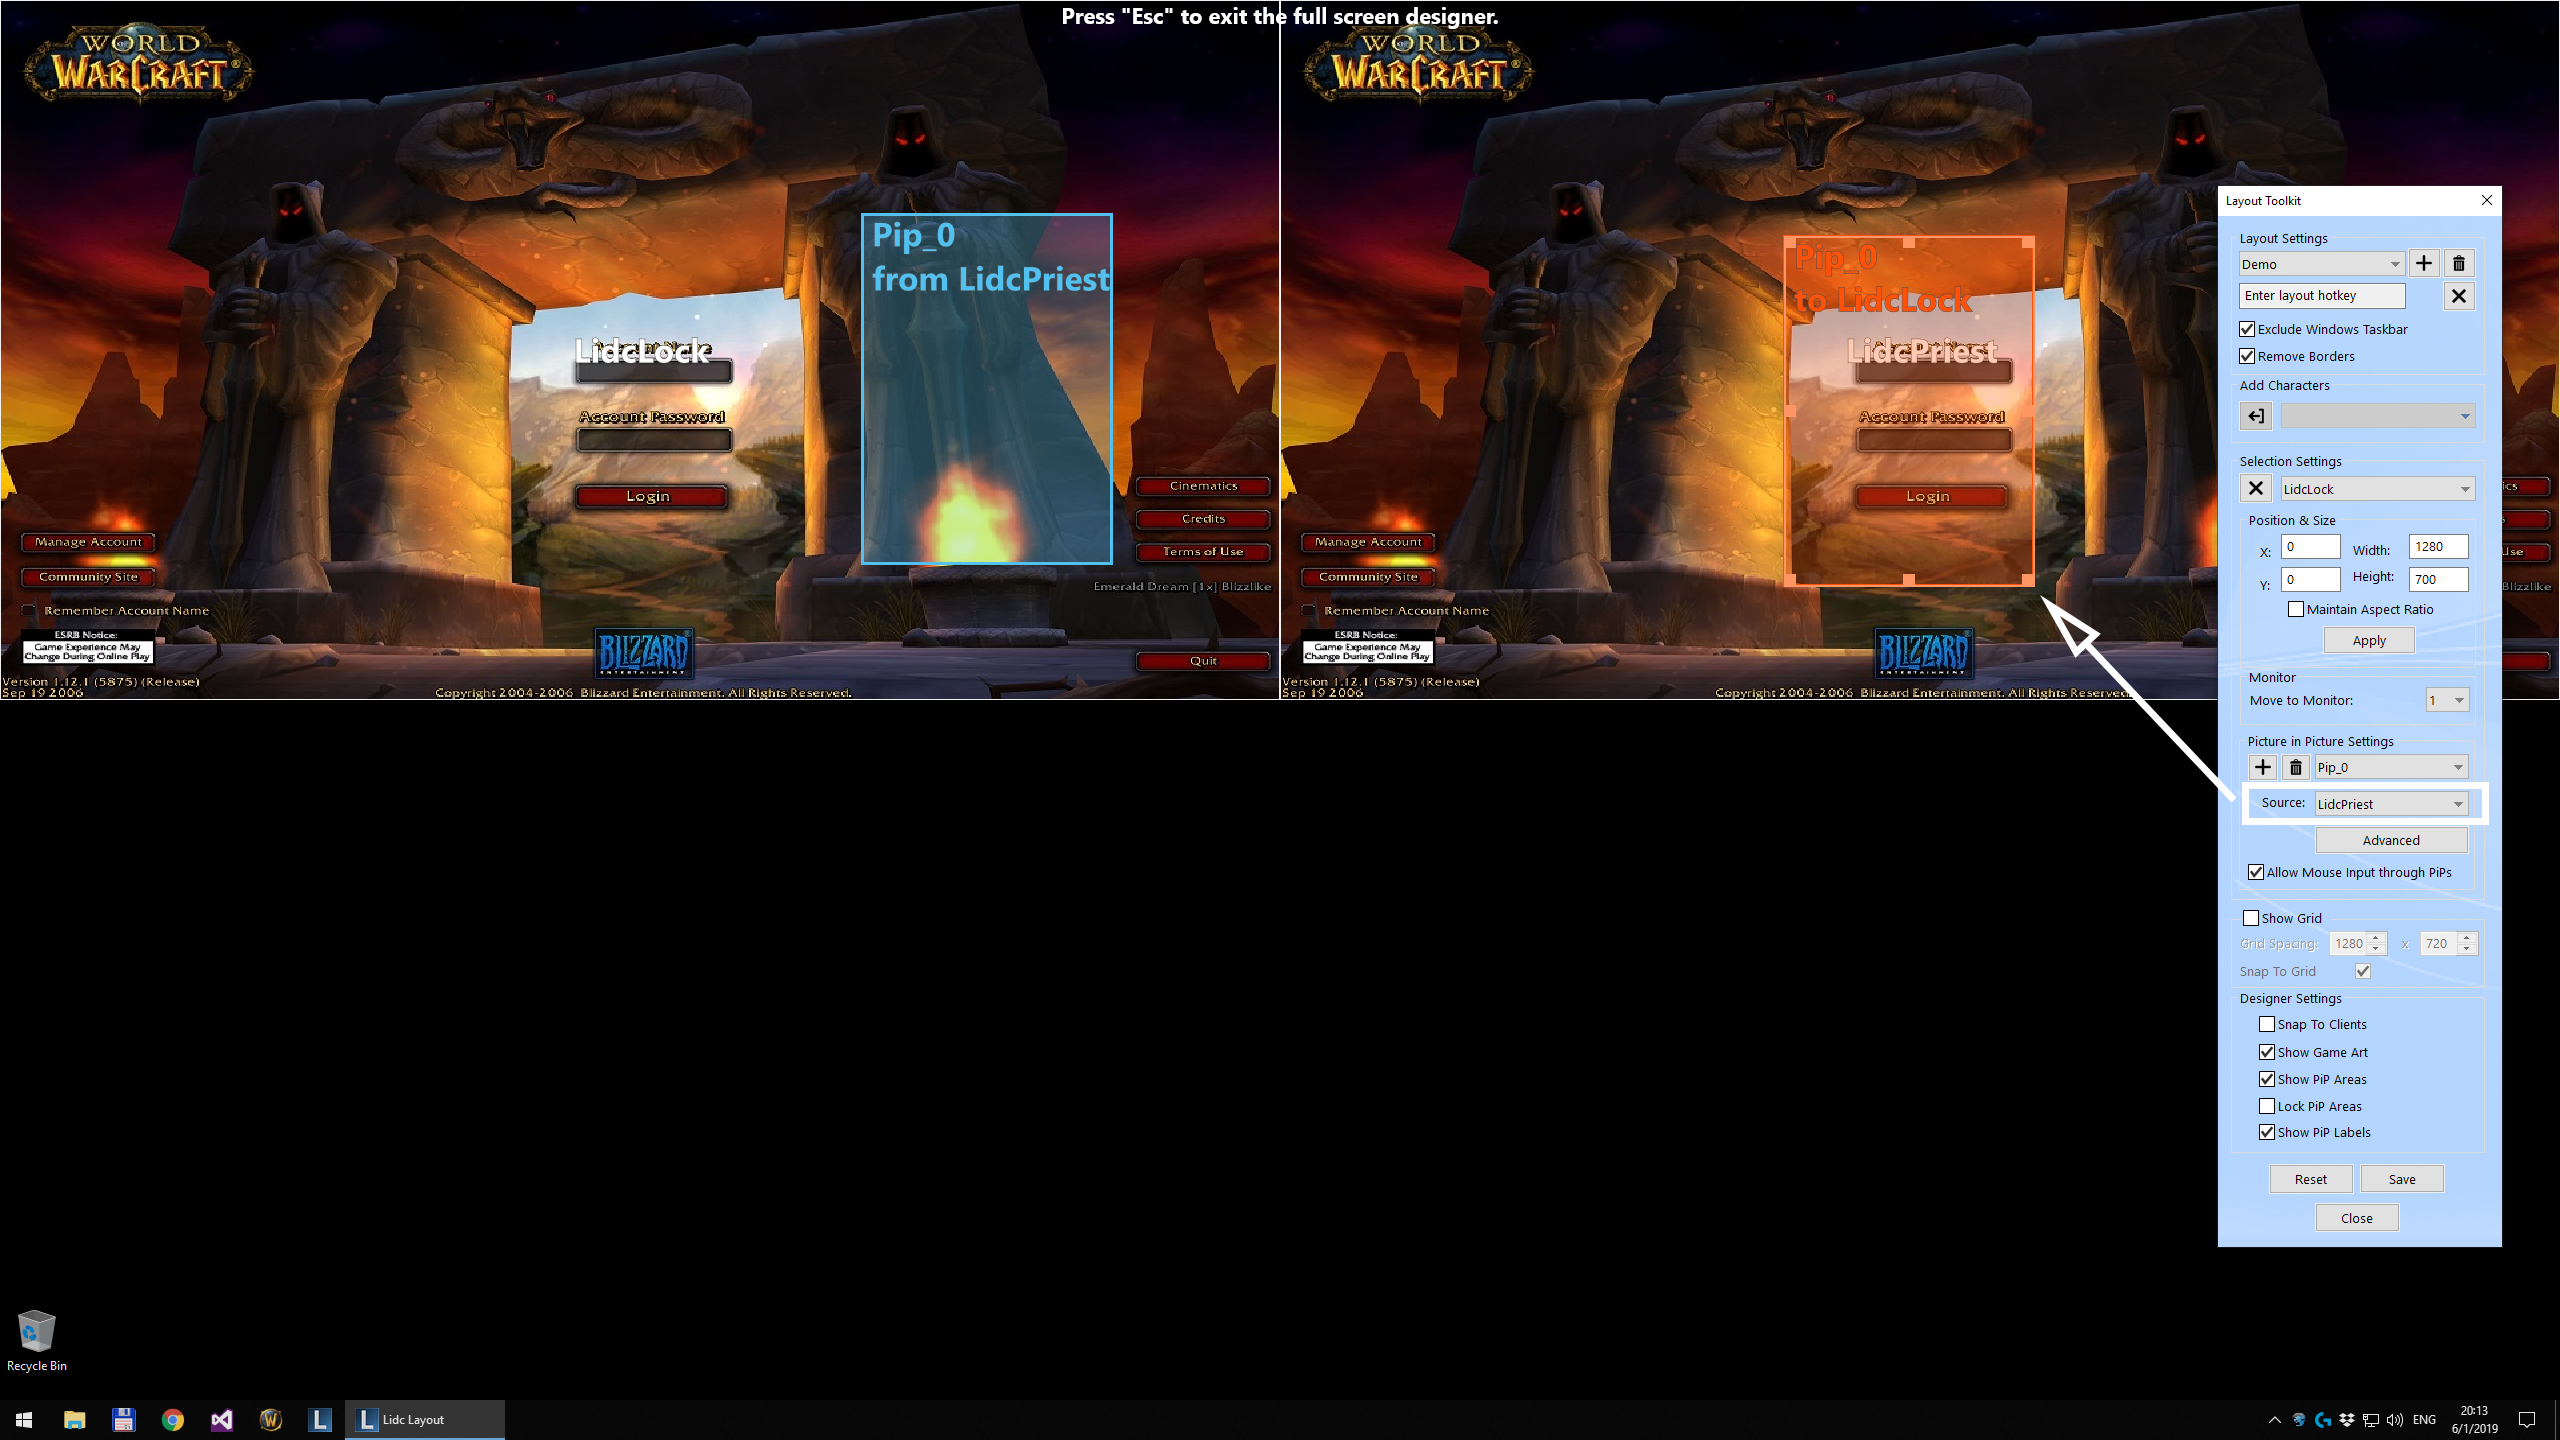
This feature provides the capability to view an area from a character's client to another character's client.
Please refer to the Picture in Picture section below for more details on how to use this feature.
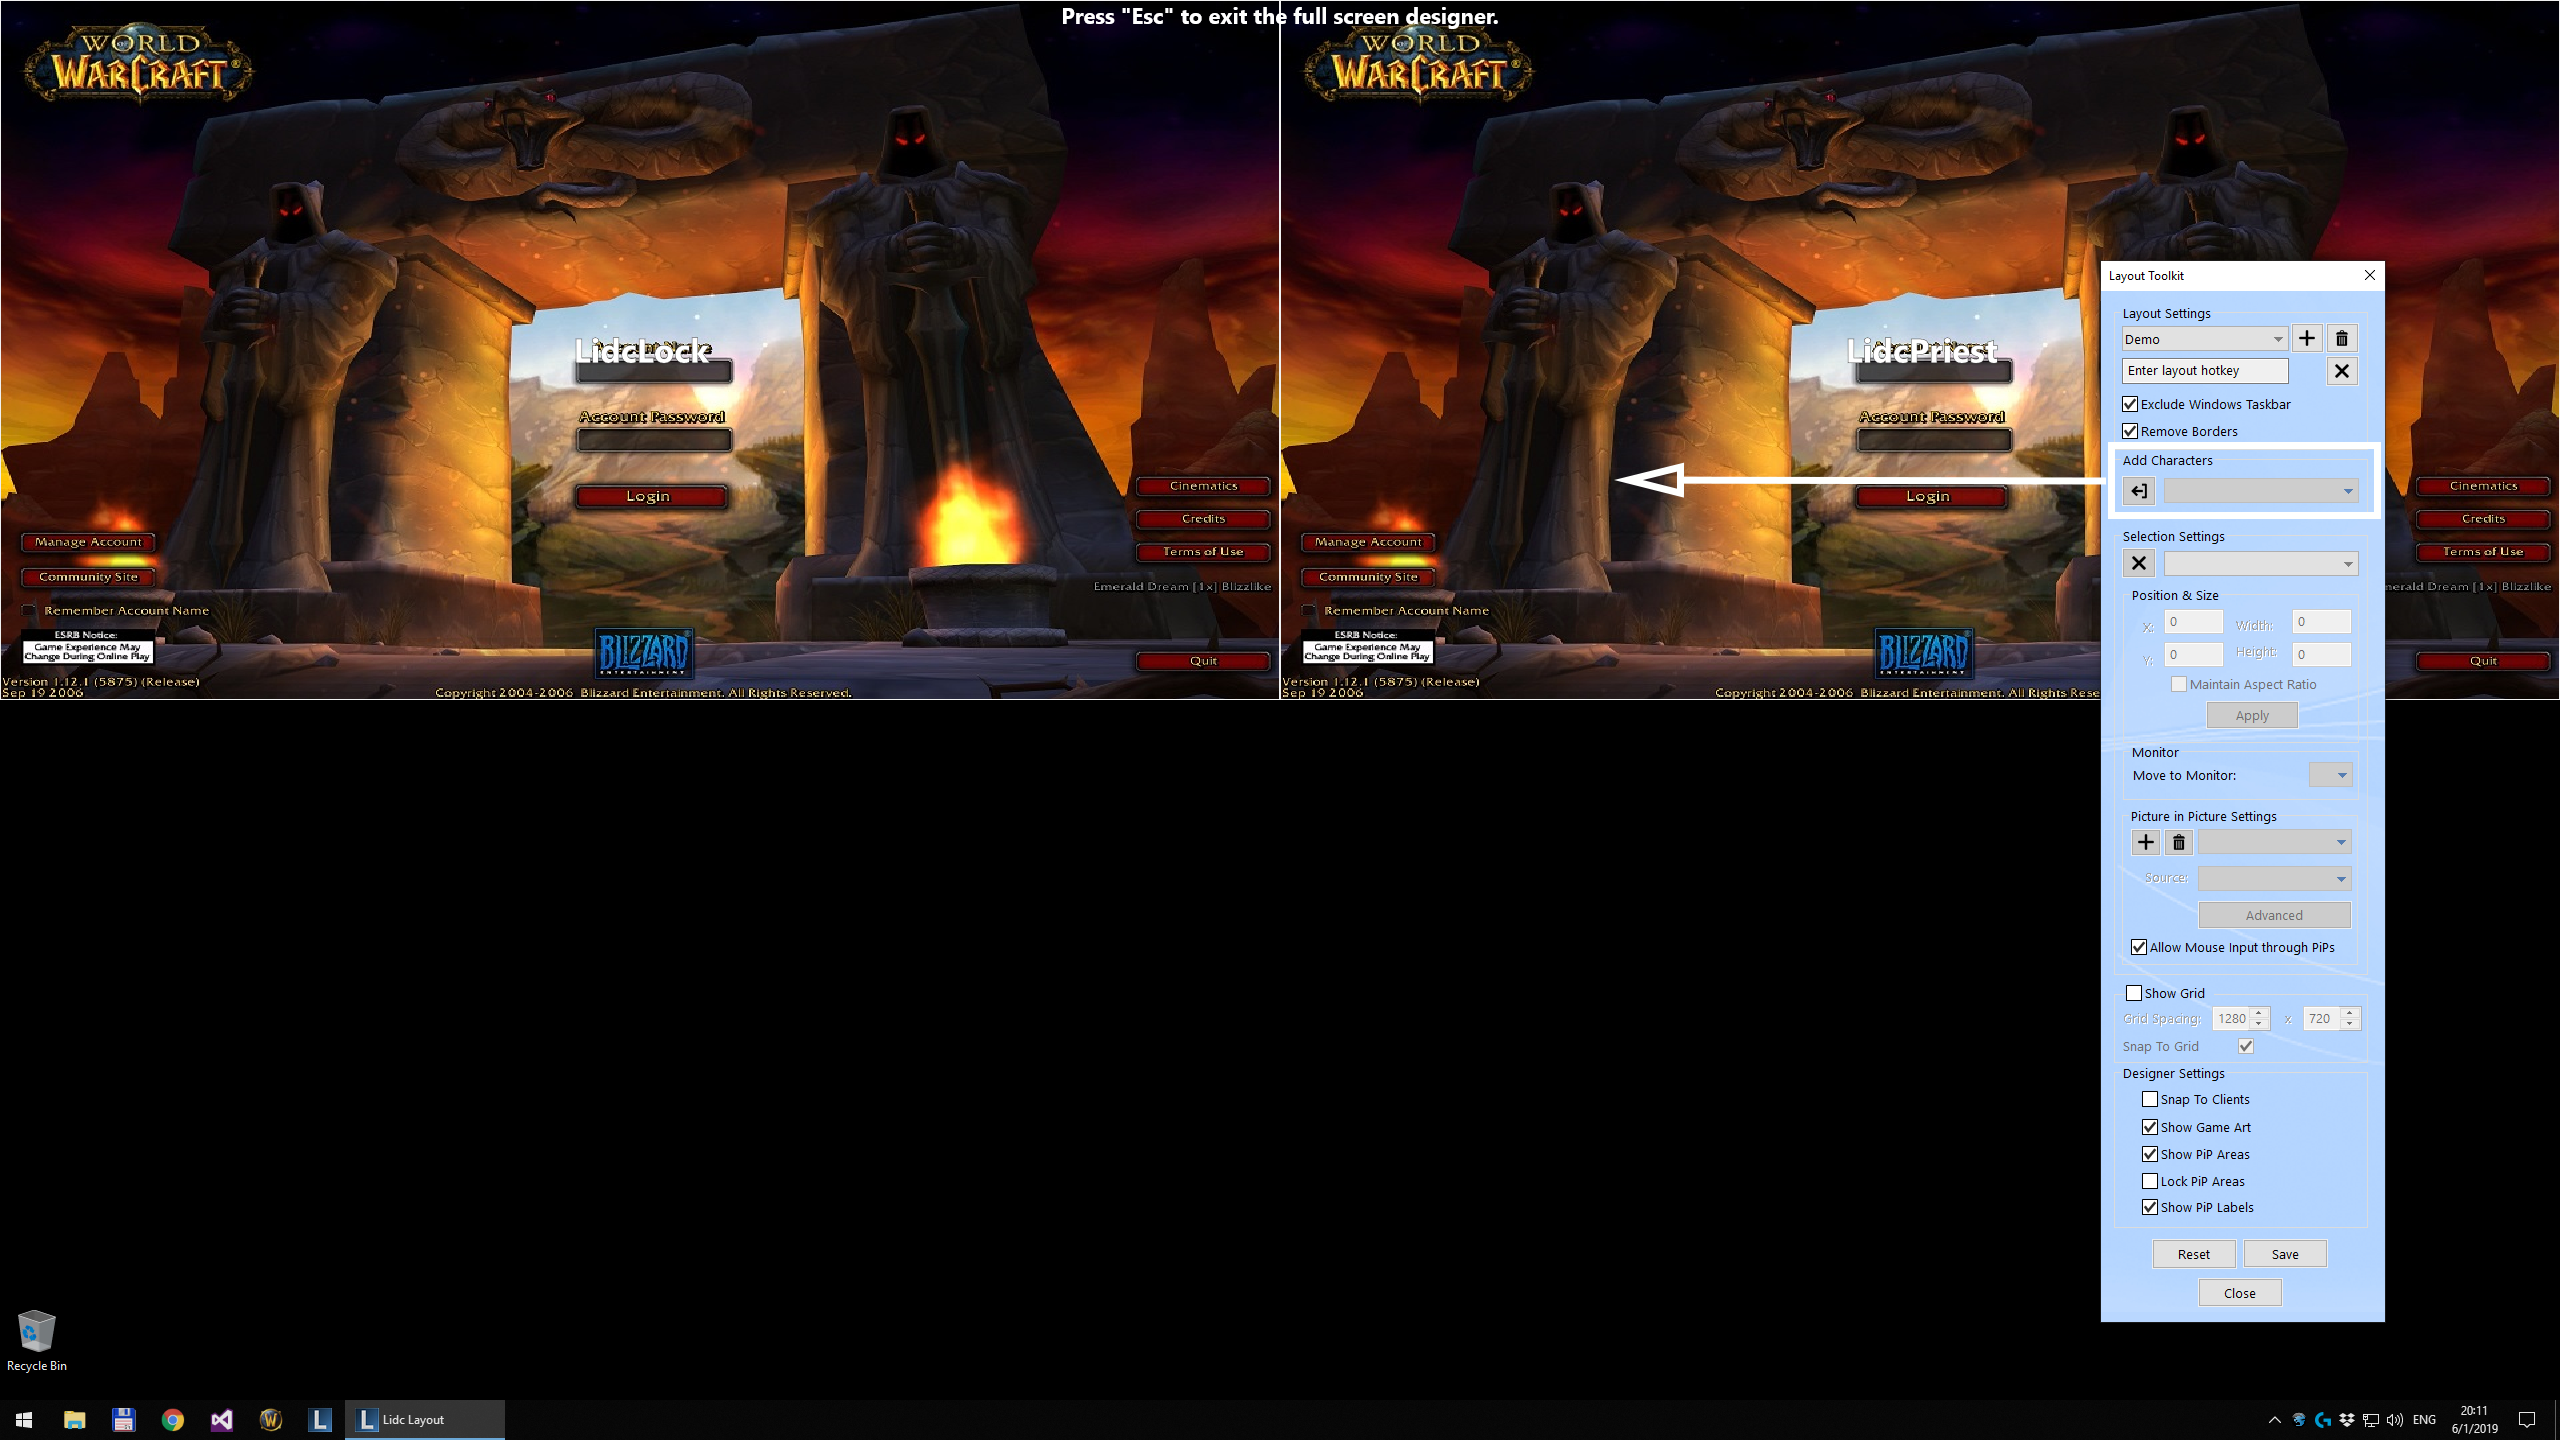
Use the Edit in Full Screen feature to create or modify a layout directly on your screen and view your clients at their real size while designing your layout. Any already running characters will use their live client window instead of the game preview image allowing you to transform your characters in real time.
The Layout Toolkit provides the same functionality as the Layout Designer. Please read the Edit with Designer section for detailed instructions.


The Picture in Picture feature provides the capability to view a specific area from one game window (source) into another game window (target). In the image below you can see an example where a source area has been selected from the window to the right and is being displayed inside the window to the left. Below the image, there are detailed instructions on how you can achieve this result by using the Full Screen Layout designer.
a) Open the Full Screen Designer, either by using the button located in the Layout Page or by using you assigned hotkey.
b) Add the characters you want to include in this layout.
c) Select the client in which you wish to add a PiP area (target) and click on the Add Picture in Picture button.
d) Select the client you wish to assign as the source in the sources drop down list.
e) Select either the source or target areas and use the selection controls to position and resize them. Alternatively you can use the advanced settings to specify the position and size of your PiP areas by using numerical values.
Remarks:
You can add multiple PiP areas and use different clients as the source for each area. The only limitation is that you can not use 2 clients as both source and target to each other's windows.
- Allow Mouse Input through PiPs
Enable this setting to allow mouse input occurring withing the Picture in Picture target area, to be send to the source client. This will effectively allow you to control any visible elements of the source client directly from the Picture in Picture target area.
- Allow Mouse Input behind PiPs
Enable this setting to allow mouse input occurring withing the Picture in Picture target area, to be send normally to the client. By default this setting is turned off because the client area behind the Picture in Picture target area is not visible and therefore it prevents from accidentally performing actions on elements that you cannot see.


The
Clink on the Edit with Designer function or the Edit in Full Screen function, to create a new layout or edit a selected one. To activate a layout from this page double click on one or right click and choose Activate. To change the order of the layout list, right click on any layout and choose Reorder.


The
The key list defines the key and key combinations that will be broadcast across your clients during your play.
When the All Keys list is selected, all keyboard and mouse keys will be broadcast including the Ctrl, Shit and Alt modifiers.
Please note that hotkeys defined in the software take precedence in this case.
Click inside the input box at the bottom of the key list and press any key or key combination you wish to broadcast. The key will be then added in the list or it will be automatically selected if it already exists. You may also add mouse buttons in the same manner but keep in mind that mouse left and right buttons will be broadcast only when mouse broadcasting is on, while any other mouse buttons will be treated as normal keys.
When creating or editing a key list you will also find some additional settings you can use:
- Toggle Hotkey: This hotkey works as both Enable and Toggle. If Key List A is currently active and you press the hotkey for Key List B, then B will be activated. If you press the same hotkey again, A will be re-activated.
- Allow Net Modifiers in Key List. This setting will allow you to input Control, Alt and Shift into the key list and broadcast them independently of any normal keys and is intended for games that support such key assignments. If your game doesn't support this, it is recommended that you leave this setting unchecked.
Initially, you will find the All Keys and User Defined key lists being already created for you but you may add additional key lists if you wish to switch between multiple key configurations during your play.
To do so, click on the + icon and provide a unique name for your new key list. You may then proceed to add any keys or key combinations to this list in the normal manner as described in the Key List section. To switch between key lists, select the desired list in the drop down list to activate it.
To remove a key list, select it in the drop down list and click on the x icon.
Enable this setting to force this key or key combination to automatically turn mouse broadcasting on. This effect is additional to the broadcasting of the key and is particularly useful when the key is activating an ability that requires targeting using the mouse. It is recommended that you combine this with the Turn Mouse Off on Left Click option in the Mouse and Activation Panel if you are normally playing with mouse broadcasting set to off and need to enable it only for specific abilities.
Remapping allows you to broadcast different keys or key combinations to your clients than the one you are actually pressing on your keyboard. There are various practical applications for this feature. One example is being able to assign complicated key combinations to abilities in game for a character while at the same time being able to activate them with easier key combinations while multiboxing. Another example is being able to remap a single key into broadcasting different movement directions to your slave clients allowing you to create cool team formations in game.
To enable remapping for this key enable the Remap setting in the Options dialog. You may then choose between three types of remapping: Simple, Round Robin and By Active Character.
Simple remapping allows you to broadcast a different key or key combination to each of your clients when pressing the remapped key.
Click inside any cell in the Keys column and press the key or key combination you would like to broadcast on your keyboard. The character displayed in that row will then receive your new key or key combination when you press the remapped key on your keyboard. An empty cell means that the displayed character in that row will receive your key press normally with no remapping performed. To remove a remap, click the cell you want to clear and click on the clear button.
Round Robin remapping works like simple remapping with the difference that each time you press your remapped key, the keys to be broadcasted to your clients will be derived from the next round. When the last round is reached, remapping will reset back to the first round and continue from there, thus creating a loop. This features allows you to create ability rotations for your characters with the use of a single button. You may use as many rounds as you wish for your rotations.
Remapping By Active Character provides the ability to specify a different remap depending on the character you are controlling at the time. In the example shown in the screenshot below, when pressing F1 while playing your mage, your warrior will receive Ctrl+F1 and everyone else will receive F1. In all other cases F1 will perform nothing since the rest of the remap fields have been left blank. This feature may be particularly useful when you would like to create a setup that allows you to switch to another main character in case your main character dies or in any way becomes incapacitated.
The remap hotkeys


The
Enable this setting to create a visible cursor for all clients while mouse broadcasting.
This option creates a fake cursor for each client window that helps you track the exact location of the mouse while mouse broadcasting. Please note that mouse will always be broadcasted when its turned on and does not depend on this option. This is only a visual aid.
Enable this setting to maintain focus to your current client when using a fast switch hotkey.
An active client is the one that has current focus and thus the one you are controlling at the time. At any point you may use another client's fast switch hotkey, defined under the character settings, in order to switch to that client. Enable this setting to prevent focus transfer and maintain control of your current client. If this setting is disabled, the involved clients will switch and control will be transferred to the switched client.
Enable this setting to automatically pass focus to another client when hovering over its window.
An active client is the one that has current focus and thus the one you are controlling at the time. When using a layout with split windows, you may wish, at any time, to take control of the client of another character by moving your mouse over its window. Enable this setting to cauuse the character to receive focus automatically and consequently give you immediate control, as soon as you hover your mouse cursor over that client. If this setting is disabled, you will need to click over the other client's window in order to pass control to the character of that client.
Enable this setting to turn mouse broadcasting off every time you left click inside a client's window.
This setting is particulary useful if you are usually playing with mouse broadcasting turned off but need to enable it occasionally to perform skills that require mouse input. In this case you may turn mouse broadcasting on at any time, perform your skill and have it automatically turn off as soon as you click inside the client area. Additionally, you may combine this setting with the Start Mouse Broadcasting setting under key options by enabling it for the the key that activates the skill that requires mouse input. The combination of these settings relieves you from having to toggle mouse broadcasting on and off every time you wish to use a skill that requires mouse input.
Enable this setting to prevent the left and right mouse buttons to be broadcasted simultaneous to your clients.
This setting is useful if you have added both the left and right mouse buttons to your key list under the Input Page and are playing with mouse broadcasting turned on. Some games translate the simultaneous pressing of both the left and right mouse buttons as forward movement and if broadcasted may cause your slave characters to move out of control.
Enable this setting to prevent mouse movement broadcasting when the left or right mouse button is pressed.
Mouse dragging is defined as moving the mouse while holding the left or right mouse button pressed. Such action is usually required when you need to move interface object across your game screen or to rotate the camera. If you find having issues when mouse dragging, like rapid camera rotation, please enable this option.

The Hotkeys Panel allows you to define keys or key combinations in order to control certain events in the software without having to switch back to the software's window.
This hotkey, when pressed, will toggle both Keys and Mouse broadcasting to on or off.
This hotkey, when pressed, will turn both Keys and Mouse broadcasting always to on.
This hotkey, when pressed, will toggle only Keys broadcasting to on or off.
This hotkey, when pressed, will toggle only Mouse broadcasting to on or off.
This hotkey, when pressed, will immediately close all client windows.
This hotkey is meant to be used for emergency situations, when for whatever reasons, you wish to close all your game windows immediately.
You may exclude certain characters from this function by enabling the Exclude from Shutdown setting under character settings.
This hotkey, when pressed, will show or hide the Lidc program window.
This hotkey, when pressed, will cause a switch between the currently active client and the client whose window is under the mouse cursor at the time. If the cursor is above the currently active client, then pressing this hotkey, will cause a switch to the next client.
Additionally, if you have the settings Activate Client on Hotkey or Activate Client on Hover under the Mouse & Activation Panel enabled, then pressing this hotkey repeatedly, will cause a switching loop between all your running characters.
This feature allows you to assign hotkeys which can toggle the keys or mouse broadcasting status for a select set of characters. It is accessible from the hotkey settings button in the Global Hotkeys section under the Input Page and also from the characters filter menu under the Characters Page.
- Click on the Add (+) button to create a new team
- Select the characters you wish to include in that team in the characters section
- Assign one or multiple hotkeys for the function you need in the Hotkeys section
- Click OK to save your team
Important Notes:
a) These functions are dependant on the global broadcasting status. This means that these hotkeys will toggle the broadcasting status of the associated team only as long as broadcasting is turned on globally in the software. If global broadcasting is stopped, these hotkeys will not turn it back on even for the associated team.
b) You can technically include the same character in different teams and you can choose to assign the same hotkey for other functions in different teams. Although it is unlikely that you would need to do that, please note that if you do, that both functions will be executed. So, for example if you add CharA in Team1 and also in Team2 and then assign F1 to Enable Mouse in Team1 and also F1 to Disable Mouse in Team2, then when you press F1 mouse will be enabled and then disabled for CharA essentially doing nothing for that character.


Click on the + icon next to your game list to add a new game.
Provide a unique name for your game and click on the browse icon (...) to locate your game's executable file. If the selected game is not included in our officially supported games list, you will be presented with a set of extra options that can aid the software in recognizing your game client during launch. For more information on how you can use these options, please check our
Games added in the game list become automatically available in the character game selection setting when creating a new or editing an existing character.
Click the browse icon at the end of the Voice Chat Software field and locate the executable file of your voice chat application.
This application will be listed at the bottom of the Run menu under the Characters Page allowing to easily launch your favorite voice chat application while launching your characters.


Enable the Close or Minimize to Tray setting to force Lidc to hide into the windows taskbar tray area when you close or minimise it.
Double click on the Lidc icon to unhide the Lidc program window.
Right click on the Lidc icon to show the Run menu which you can use to run your characters, groups, layout and voice chat software.
Check the Tray option to receive a system tray notification, when you toggle broadcasting or change your layout.
Check the Screen Status Display option to enable an on screen notification, when you toggle broadcasting or change your layout.
You may also click on the Pin icon next to this setting to customise the position, font and color of the visual notification.

Enable the Launch Lidc on Windows Startup setting to automatically run Lidc every time Windows start.
Enable the Broadcast on Startup Keys or Mouse setting to automatically turn broadcasting on when running Lidc.
Enable the Check for Updates on Startup setting to automatically check for updates for Lidc every time you run it.

The data menu offers the ability to backup and restore all your data including your Characters, Groups, Layouts, Keys and Hotkeys. Use this functionality to create backups for safekeeping and to transfer your data in case you wish to play on another computer.
To backup your data, click on the Data menu and choose Backup.
Browse your computer for your desired export location and enter a name for your backup file.
To retore your data, click on the Data menu and choose Restore.
Browse your computer for your backup file and click open.
Please note that your current data will be overwritten and that this operation can not be undone.
To reset your data, click on the Data menu and choose Reset.
Please note that your current data will be entirely removed and that this operation can not be undone.
It is recommended you create a backup using the Export function before resetting your data.

Use the License Activator to activate or deactivate your Lidc license.
If you are a new user, then you are eligible for a
Upon purchase of a new license for Lidc, you will instantly receive an email with your personal serial number. Please check your inbox (and junk folder) at the email address you used for your purchase and take a note of the included serial number. In order to activate the software, please click on the Help button under the Settings Page, choose License Activator, enter the required information along with your serial number and click on Activate. You may rest assured that your personal information shall be kept private and may only be used for the purpose of providing you with support should you ever experience any issues with the software. Please note, that your license is per computer and thus it may only be active at one computer at a time. Should you ever wish to transfer your license and use Lidc on another computer, open the Activator again and click on Deactivate. You may then use your serial number on another computer.
Please note that in any case, your license period begins the moment you activate the software for the first time regardless of the date on which you purchased your license or requested a trial serial number.
If you have any issues with your license, you may attempt to resolve them using our License Issue Resolution Center or by contacting Lidc Support via email to This email address is being protected from spambots. You need JavaScript enabled to view it..
Use the Check for Updates function to check for possible software updates.
Quality assurance and customer feedback are very important to us and we thererfore use them to provide you with frequent updates that include bug fixes and additional featurers. Click on Help and choose the Check for Updates function to check if there are currently any updates available for Lidc. Additionally, you may enable the Check for Updates on Startup setting under the Settings Page to make sure you are instantly notified of any new updates every time you run Lidc.
Use the View Changelog function to display a list of changes and fixes that were applied in previous updates of Lidc.
Use the Submit Report function to tell us about any issues you may be experiencing or any suggestions you may have.
Customer feedback is very important to us and you may rest assured that anything you report to us, will be taken into account when designing the future updates of the software. Such feedback may include either a report for a bug you have experienced or a suggestion about a new feature you would like to see included in the next update of the software. You may also contact us via email to This email address is being protected from spambots. You need JavaScript enabled to view it. for any issues you may be experiencing or to This email address is being protected from spambots. You need JavaScript enabled to view it. for any suggestions you may have.
Use this function to display the About dialog of Lidc.


In some cases, a particular character ability, may require you to point to a target area within the game by moving your mouse to the desired location and clicking. For such ability, you will require that the cursor moves concurrently for all your characters and that all your characters can click at the same time to that location. To do this with Lidc, you need to turn mouse broadcasting on which also broadcasts mouse movement and make sure you have added Left Click in your Keys list under the Input page.
However, if having to toggle mouse broadcasting every time you wish to use such ability, turns out to be a bit inconvinient here is a trick you can do with Lidc:
- Navigate to the Input Page, find the key that activates the AoE ability in your key list, select it, click on Options and within the Options dialog, enable the setting called
- Under the Input Page, within the Mouse & Activation panel, enable the setting called
The combination of these two settings will allow you to use your mouse for AoE abilities without having to bother with turning mouse broadcasting on and off every time you wish to use such an ability.
You may have seen multiboxers creating cool shapes and formations with their characters at the press of a button and you would love to do the same. Good news, you can easily do that with Lidc by using
- Navigate to the Input Page and add the key you would like to use for formations in your key list.
- Make sure it is selected and click on Options.
- Enable the Remap setting and leave the remapping type to Simple for now.
- Go in game and find out which keys cause your characters to move forward, backward, strafe left and strafe right.
- In the grid below, leave the cell for the character that will at the center empty.
- Click inside the cell of each of the other characters and press the direction key you would like that character to move to.
Thats it! Go in game, place your characters on top of each other and press the key you configured for formations (keep it pressed).
In the same manner you can create other kind of formations, depending on how many characters you have and your imagination!
While controlling one of your characters you may often wish to quickly switch to another character's window.
The most usual way to do this, is by assigning a
- Navigate to the Input Page and assign a hotkey for
Now you can use this Hotkey in two ways. The first one is, the obvious one, that you can hover your mouse over the client you wish to switch to and press that hotkey. The second way is that you may press that hotkey without hovering your mouse which will just cause a switch with the next character. Keep pressing that one hotkey to go around all your characters in a loop.
Additionaly, it is recommended that you enable the setting called
When running multiple clients at the same time, you may often need to use different in-game settings for each character. For example you might want to run you main character using the highest quality graphics settings and your slave characters using the lowest quality graphics settings to improve overall performance. There are some ways to achieve this but in many cases you end up using separate game folders which can prove a bit of a hassle to maintain. Not any more.
By using the Game Settings feature you may specify game settings and values for each of your characters and have those settings applied to your game every time you launch that character. Following is an example of how to use this feature playing World of Warcraft. The process though, is exactly the same for all supported games.
- First navigate to the Characters Tab and double click on the character you wish to edit.
- Make sure your game is selected in the games drop down list.
- Click on the Game Settigns icon (...) next to the Add Game icon (enabled only for supported games).

The settings you see on the Current Game Settings list, along with their respective values, are the settings that are currently defined in the game's configuration files. The list on the right side is where we will add the settings we wish to change for this individual character. Check the enable custom game settings checkbox to enable this feature for this character.

The Append Mode will retain all current game settings and only modify the settings you specify under Character Game Settings.
- Select the setting you wish to change in the Current Game Settings list and click on the Add Setting arrow (or double click) to add it in the Character Game Settings.
- Click inside the value field of that setting to change its value.
- If you wish for that setting to be entirely removed, select it and choose Action Delete in the radio below.
- If you wish to add a new setting that is not currently listed under Current Game Settings, click on the Add Custom Setting icon (plus icon) and input its name.
- To remove a settings from the Character Game Settings, select it and click on the Remove Setting icon at the bottom.
- To remove all current Character Game Settings, click on the Remove All Settings icon at the bottom.

Although some of the game settings are named in a way that makes them self-explenatory, it may not be always easy to figure out exactly which settings you need to use or change to achieve the required results. The replace mode can simplify that process for you by allowing you to replace the existing game settings entirely.
- Launch your game normally and use the in-game options to change all the settings you wish to use for a specific character.
- Exit your game as it is sometimes required for your changes to be saved into the configuration files.
- Open the Game Settings feature for your character and choose the Replace Settings mode.
- Click on the Replace All Character Settings arrow to copy all available settings to the Character Game Settings and click OK.
- Repeat the process for more characters.

The configurations section allows you to save your current choice of settings into a named configuration which you may then use to import into other character settings. A common use for that feature is when creating low quality graphics settings for one of your slave characters and then wish to use the same settings to the rest of your slave characters.
- New will create a new configuration using the current Character Game Settings
- Import will import all settings under the selected configuration into the current Character Game Settings.
- Update will update the selected configuration with the current Character Game Settings.
- Remove will remove the currently selected configuration.

Lidc has been designed to be a general broadcasting tool and thus is not bound to any specific game or application. The games listed under our supported games section, are only those that have been thoroughly tested and are guaranteed to work well with all the software features. You may, however, attempt to use Lidc with any game you like as it is very likely that it will meet your expectations. If you wish for any game to be added to our officially supported game list, you may send us a suggestion via email to This email address is being protected from spambots. You need JavaScript enabled to view it.
World of Warcraft
Everquest
The Lord of the Rings Online
Tera Online
Dark Age of Camelot
Ultima Online Classic
Anarchy Online
To add an expansion of World of Warcraft to Lidc, please navigate to the Settings Page and click on the add icon (+) next to your game list. Provide a unique name for this game and click on the browse button to locate the game's executable. The executable for World of Warcraftt is called Wow.exe for all expansions of the game with the addition of Wow-64.exe for any expansion after MoP.
For the 64-bit version of Lidc, you may choose either Wow-64.exe (recommended) or Wow.exe.
For the 32-bit version of Lidc, please choose Wow.exe.
Please note, that if you are playing on retail you may also use the launcher but its preferred that you run the game directly using the main executable. Also, if you are playing on a private project using a custom client, the executable name may be a bit different though it is usually still in the form of Wow*.exe.
To add a client of Everquest to Lidc, please navigate to the Settings Page and click on the add icon (+) next to your game list. Provide a unique name for this game and click on the browse button to locate the game's launcher executable. The launcher executable for Everquest is called LaunchPad.exe.
To add a client of The Lord of the Rings Online to Lidc, please navigate to the Settings Page and click on the add icon (+) next to your game list. Provide a unique name for this game and click on the browse button to locate the game's launcher executable. The launcher executable for The Lord of the Rings Online is called TurbineLauncher.exe.
To add a client of Tera Online to Lidc, please navigate to the Settings Page and click on the add icon (+) next to your game list. Provide a unique name for this game and click on the browse button to locate the game's launcher executable. The launcher executable for Tera Online is called TERA-Launcher.exe.
When running a character for Tera Online, the launcher will show and Lidc will wait for the game client to run before proceeding to the next character. If you have provided your account information, Lidc will also attempt to fill in your information to the launcher and run the game client automatically. The launcher will be then closed to allow running it again for the next character.
Special Note: The current version of Tera Online requires that the game launcher remains open until you have logged onto the game world. For that reason it is not possible to automate running mutliple clients in sequence. You will need to run each client separately and close the launcher manually before launching the next client.
To add a client of Dark Age of Camelot to Lidc, please navigate to the Settings Page and click on the add icon (+) next to your game list. Provide a unique name for this game and click on the browse button to locate the game's launcher executable. The launcher executable for Dark Age of Camelot is called camelot.exe.
When running a character for Dark Age of Camelot, the launcher will show and Lidc will wait for you to enter your account information, select the server and run the game. The launcher will then be closed automatically and will be shown again to proceed to the next character.
If you wish, you may bypass the launcher process entirely and have Lidc run your client directly to the realm selection list. In order to do that, you will need to provide your account information in the character settings and check the Autoconnect setting. In that case, a new setting will be shown next to the Autoconnect checkbox to allow you to select your server.
To add a client of Ultima Online Classic to Lidc, please navigate to the Settings Page and click on the add icon (+) next to your game list. Provide a unique name for this game and click on the browse button to locate the game's executable. The executable for Ultima Online Classic is called UO.exe.
To add a client of Anarchy Online to Lidc, please navigate to the Settings Page and click on the add icon (+) next to your game list. Provide a unique name for this game and click on the browse button to locate the game's executable. The executable for Anarchy Online is called Anarchy.exe.
To add a client of RuneScape to Lidc, please navigate to the Settings Page and click on the add icon (+) next to your game list. Provide a unique name for this game and click on the browse button to locate the game's executable. The executable for RuneScape is called RuneScape.exe.
To add a client of Diablo to Lidc, please navigate to the Settings Page and click on the add icon (+) next to your game list. Provide a unique name for this game and click on the browse button to locate the game's executable. The executable for Diablo III is called Diablo III64.exe and is located under the x64 folder of your game's installation folder.
Even if the game you wish to play is not included in our supported games list, you may still attempt to use Lidc with it by adding a game normally and choosing your game's client executable , or game launcher if that is required. To aid Lidc in properly recognizing your game client, you will be presented with the following options in the Add Game window.
- Game using launcher
Check this setting if the selected executable is a game launcher which in turn launches the actual game window. Set the launcher's mode to "Interfaced" if the launcher comes with a graphical user interface where you are required to press a button before the final game client is launched. If your launcher works just as an intermediate and launches the final game client immediately, set the launcher mode to "Direct".
- Game Class
This setting indicates the window class name of the game window, and if provided, it will greatly increase the chances of getting your game recognized by the software during launch. To obtain this information you will need to use a tool that can display window class name information for all windows in your system. Such tools are available as freeware on the internet. If such an endeavor sounds a little bit too technical, please don't hesitate to contact support with your game information and we will do our best to obtain it for you.
- Keep game in foreground
Some games require to stay in the foreground in order to receive keyboard and mouse input. If you successfully launch your games and still can't broadcast input, try checking this setting and relaunch your game clients. Please note that this may result in hearing sound from all game clients simultaneously.
